Tricks and techniques I’ve learned while developing an app for tvOS.
Božidar Labaš
Dec 12, 2023
In this blog post, I will share the most important differences I discovered between iOS and tvOS while developing a tvOS app. As you explore these distinctions, consider this as a valuable starting point for your journey into tvOS development.
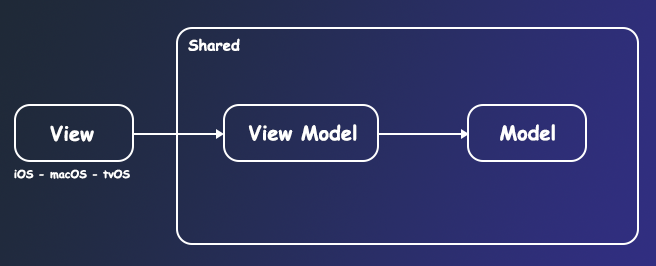
The tvOS app I worked on had already been implemented for iOS and macOS. Each platform has its own target with a corresponding UI. Adopting the MVVM architecture simplified the process of implementing the tvOS UI and connecting ViewControllers with existing ViewModels.
This blog post will cover the following sections:
-
tvOS Frameworks:
Determine which frameworks to use for developing a tvOS app.
-
UI Implementation
Choose a method for implementing the UI.
-
Key Differences Between iOS and tvOS App Development
Apple TV uses a physical remote control. Button states on tvOS need to be managed, and the focus engine holds significant importance in tvOS development.
-
tvOS Restrictions
Discuss any limitations specific to tvOS.
Everything explained in this post will be available on GitHub, where you can look at the finished implementations as you follow along.
tvOS frameworks
tvOS apps can be developed through the traditional fully native approach, employing Objective-C or Swift, Storyboards, XIBs, Autolayout in code, as well as SwiftUI.
Alternatively, developers can opt for another approach using TVML (TV Markup Language) and the TVJS framework.
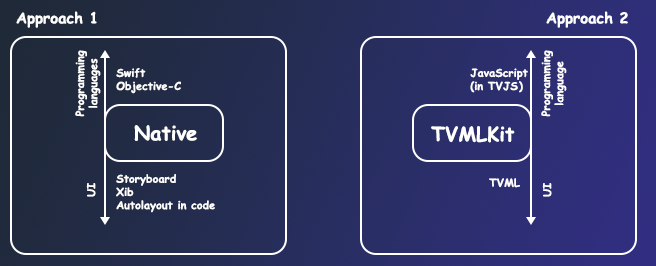
I chose approach 1 for these reasons:
-
Consistency Across Platforms:
Unified Swift codebase ensures seamless cross-platform development, code reuse, and simplified maintenance. -
Leveraging Existing Expertise:
Leveraging my strong Swift and iOS development background promotes efficiency and minimizes the learning curve associated with new frameworks like TVML. -
Full Control Over UI and Interactivity:
The native approach provides granular control over UI and behavior, essential for crafting a seamless and tailored user experience aligned with project goals. -
Utilizing Rich iOS Ecosystem:
Choosing the native approach taps into the wealth of iOS libraries, tools, and resources, facilitating seamless integration and accelerating development.
UI implementation
Ways to implement UI in tvOS include:
- Autolayout in code (using NSLayoutConstraint or some external libraries)
- Storyboards and Interface Builder
- SwiftUI
I chose Auto Layout in code, using the native NSLayoutConstraint class for UI, opting for its simplicity and eliminating the need for additional libraries.
Key differences between iOS and tvOS app development
The most important differences are:
- Controls
- Button states
- Focus engine
Controls
Touch Interaction on iOS vs. Remote Control on tvOS:
-
iOS (Touch):
iOS devices rely heavily on touch interactions. Users interact with the screen using gestures like tapping, swiping, pinching, and dragging.
-
tvOS (Remote control)
Apple TV uses a physical remote control (or the Apple TV app on iOS devices) for navigation. The remote includes a touch-sensitive surface for swiping, clicking, and navigating.
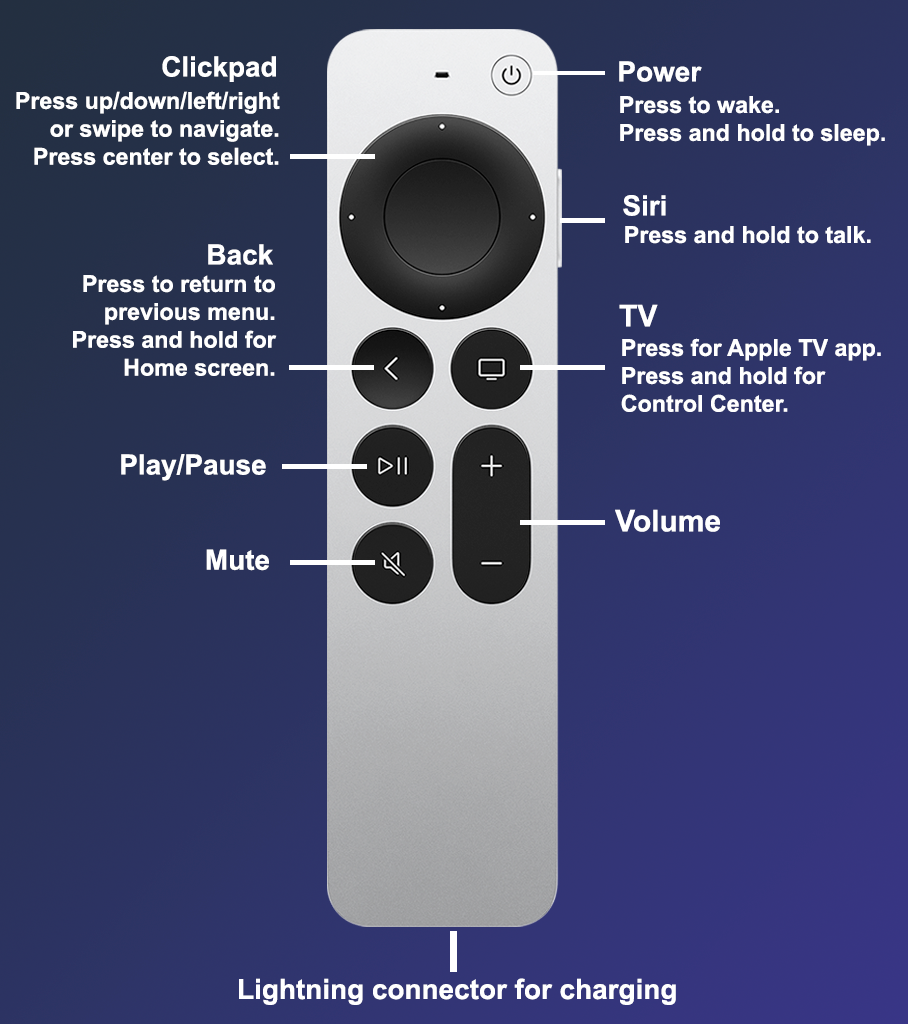
When the user presses any of the controls on the TV remote, the pressesBegan function is triggered. By utilizing the UIPress.PressType enum, we can detect which control is selected and handle the corresponding action.
override func pressesBegan(_ presses: Set<UIPress>, with event: UIPressesEvent?) {
    super.pressesBegan(presses, with: event)

    for press in presses {
        switch press.type {
        case .select:
            // handle select button
        case .rightArrow:
            // handle right arrow button
        case .leftArrow:
            // handle left arrow button
        case .upArrow:
            // handle up arrow button
        case .downArrow:
            // handle down arrow button
        default:
            break
        }
    }
}
Additional functions for managing press events on the remote include:
func pressesEnded(_ presses: Set, with event: UIPressesEvent?)
func pressesChanged(_ presses: Set, with event: UIPressesEvent?)
func pressesCancelled(_ presses: Set, with event: UIPressesEvent?)
Button states
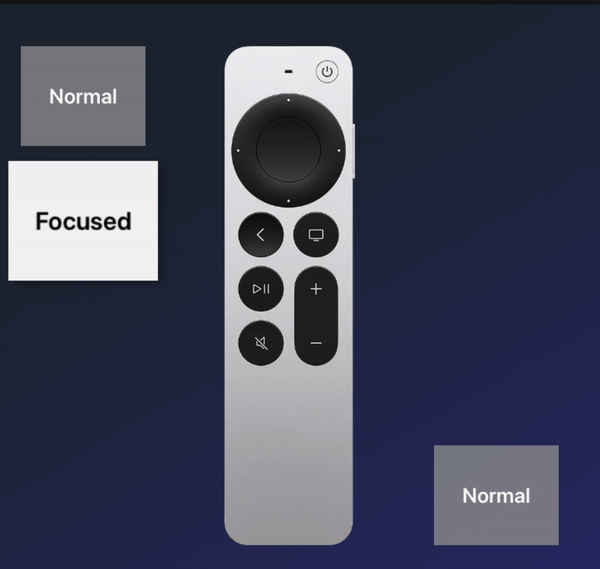
Buttons in tvOS have three key states:
-
Normal
The default state of a button. -
Highlighted
Activated in response to user interaction, visually standing out to signify engagement. -
Focused
Indicates the button has received focus, typically through navigation or user input.
The button state can change to any of these states as the user navigates through the app.

We can update the button background when its state changes. One way to achieve this is by extending the UIButton class and adding functionality to handle focused, highlighted, and normal colors.
extension UIButton {

    func setNormalColor(_ color: UIColor) {
        let image = UIImage.imageWithColor(color)
        setBackgroundImage(image, for: .normal)
    }

    func setFocusedColor(_ color: UIColor) {
        let image = UIImage.imageWithColor(color)
        setBackgroundImage(image, for: .focused)
    }

    func setHighlightedColor(_ color: UIColor) {
        let image = UIImage.imageWithColor(color)
        setBackgroundImage(image, for: .highlighted)
    }

}
The function imageWithColor(_ color: UIColor) is used to create a solid color image that matches the desired color, and then this image is set as the background for different states of a UIButton.
After extending the UIButton class, the button's background color, based on its state, can be set as follows:
button.setHighlightedColor(.white)
button.setNormalColor(.blue)
button.setFocusedColor(.red)
For better customization of button properties such as fonts, title color, and size when the state changes, creating a custom UIButton extension offers a straightforward solution.
class FocusedButton: UIButton {

    override var isHighlighted: Bool {
        didSet {
            if isHighlighted {
                // handle highlighted state
            } else {
                if isFocused {
                    // Handle highlighted and focused state
                } else {
                    // Handle normal state
                }
            }
        }
    }
Additionally, we can handle the case when the button becomes focused.
override func didUpdateFocus(in context: UIFocusUpdateContext, with coordinator: UIFocusAnimationCoordinator) {
    if context.nextFocusedView == self {
        // handle focused state
    }

    if context.previouslyFocusedView == self {
        // handle the case when the button loses focus.
    }
}
In tvOS development, focus plays a crucial role in guiding users with a remote control, setting it apart from iOS where touch inputs play a major role. The next section of this blog will explore focus, addressing potential challenges in handling focus changes.
Focus Engine
These elements can become focused:
- UIButton
- UIControl
- UISegmentedControl
- UITabBar
- UITextField
- UISearchBar (with the internal text field being focusable)
Exceptions include UICollectionViewCell and UITableViewCell, where focusability is determined by the delegate functions collectionView(_:canFocusItemAtIndexPath:) and tableView(_:canFocusRowAtIndexPath:).
Handle focus change manually
It is easy to navigate through focusable views when they are aligned horizontally and vertically. This works automatically. Focus is also automatically managed in both UICollectionView and UITableView. However, if you place a focusable view on a diagonal path, it will not become focused when navigating to it using the remote.
As illustrated in the example below, the button to the right of the remote is not horizontally aligned with the currently focused button. Consequently, a right swipe on the remote will not shift the focus from the currently selected item to the item on the right side of the remote.
UIFocusGuide can assist us in addressing the challenge of manually changing focus for diagonally aligned views.
In the example bellow, we have origin and destination buttons diagonally aligned, preventing automatic focus transition. To address this, we'll create a properly aligned UIFocusGuide, acting as an invisible intermediary between the origin and destination. This guide will seamlessly propagate focus from the origin to the destination button.
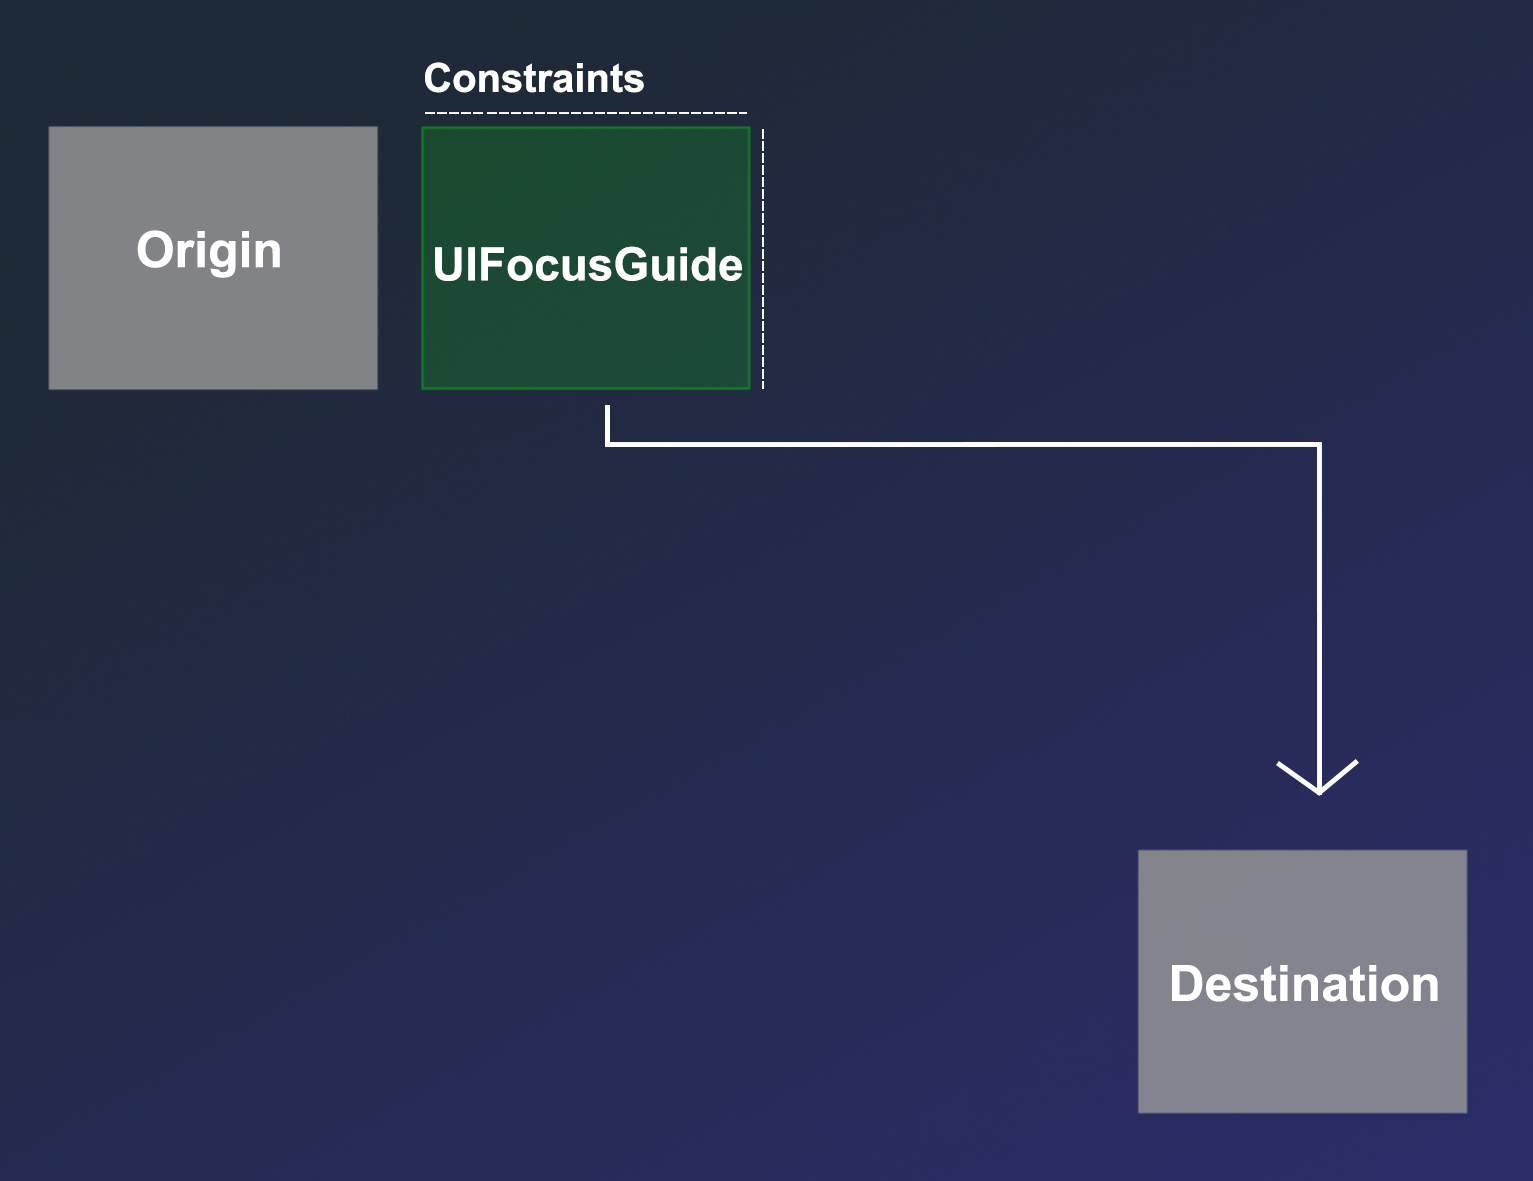
Apple documented a perfect description of what UIFocusGuide is responsible for:
UIFocusGuide represents an invisible, focusable region that can redirect focus movement to other views.
The latest problem we encountered was changing focus from the left origin button to the right destination button, which is diagonally aligned. Let's break down the solution to this problem into four steps:
-
Initialize UIFocusGuide.
let focusGuide = UIFocusGuide()
-
Add UIFocusGuide to the root view.
view.addLayoutGuide(focusGuide)
-
Set the destination where the guide will redirect focus.
focusGuide.preferredFocusEnvironments = destinations
-
Set constraints to ensure the focus guide is horizontally aligned with the origin view.
focusGuide.topAnchor.constraint(equalTo: origin.topAnchor).isActive = true
focusGuide.leftAnchor.constraint(equalTo: origin.rightAnchor, constant: 20).isActive = true
With this approach, we've handled focus changes in one direction. However, in the app, there might be multiple instances of button focus changes that we wish to manage manually. For each case, we would need to rewrite similar code every time. To streamline this process, we can extend the UIViewController with a reusable function called addFocusGuide(). This function will take the origin view, destination view, and the desired direction for handling focus changes.
@discardableResult
func addFocusGuide(from origin: UIView, to destination: UIView, direction: UIRectEdge) -> UIFocusGuide {
    let focusGuide = UIFocusGuide()
    view.addLayoutGuide(focusGuide)
    focusGuide.preferredFocusEnvironments = [destination]
    focusGuide.widthAnchor.constraint(equalTo: origin.widthAnchor).isActive = true
    focusGuide.heightAnchor.constraint(equalTo: origin.heightAnchor).isActive = true

    switch direction {
    case .bottom:
        focusGuide.topAnchor.constraint(equalTo: origin.bottomAnchor, constant: -20).isActive = true
        focusGuide.leftAnchor.constraint(equalTo: origin.leftAnchor).isActive = true
    case .top:
        focusGuide.bottomAnchor..constraint(equalTo: origin.topAnchor, constant: 20).isActive = true
        focusGuide.leftAnchor..constraint(equalTo: origin.leftAnchor).isActive = true
    case .left:
        focusGuide.topAnchor..constraint(equalTo: origin.topAnchor).isActive = true
        focusGuide.rightAnchor..constraint(equalTo: origin.leftAnchor, constant: -20).isActive = true
    case .right:
        focusGuide.topAnchor..constraint(equalTo: origin.topAnchor).isActive = true
        focusGuide.leftAnchor..constraint(equalTo: origin.rightAnchor, constant: 20).isActive = true
    default:
        break
    }

    return focusGuide
}
To position the focus guide next to the origin button, we use the right direction:
addFocusGuide(from: originButton, to: destinationButton, direction: .right)
To bring the focus back to the origin button, we need to implement focus direction in both ways:
addFocusGuide(from: destinationButton, to: originButton, direction: .left)
There is one issue that I found while implementing UIFocusGuide. In the addFocusGuide() function, you can see that I included a constant with a value of 20 for both vertical and horizontal constraints. The purpose of this is to ensure that the frame of the UIFocusGuide does not overlap with the frame of the origin view. If such overlap occurs, it can disrupt the proper functioning of the focus.
When we create UIFocusGuides that handle both directions and do not overlap with the origin frame, everything should work as expected.
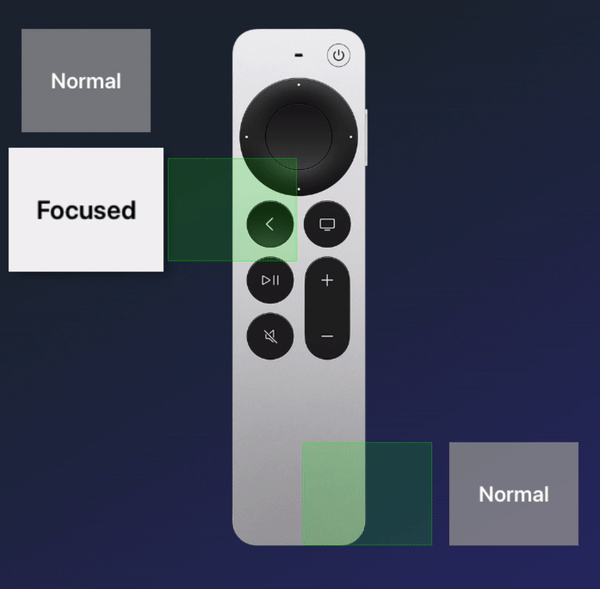
In the example above, you can see UIFocusGuide represented by the green rectangle. However, it's important to note that UIFocusGuide is invisible. For visualization purposes, I utilized the layout frame of UIFocusGuide and rendered a view at the same location. This view is named FocusGuideView, and it is initialized inside our addFocusGuide() function when needed. You can see the full implementation here.
class FocusGuideView: UIView {

    init(focusGuide: UIFocusGuide) {
        super.init(frame: focusGuide.layoutFrame)
        backgroundColor = UIColor.green.withAlphaComponent(0.15)
        layer.borderColor = UIColor.green.withAlphaComponent(0.3).cgColor
        layer.borderWidth = 1
    }

    required init?(coder aDecoder: NSCoder) {
        return nil
    }
}
If you want to render UUIFocusGuide for debugging purposes, you can do this by setting the debugMode property to true.
addFocusGuide(from: originButton, to: destinationButton, direction: .right, debugMode: true)
tvOS restrictions
There are 3 tvOS restrictions that I found:
-
Maximum size for a tvOS app.
As stated in the Apple documentation, the maximum size for a tvOS app bundle is 4 GB. However, using tags and on-demand resources, your app can add another 20 GB of resources to a running app.
-
Local storage is limited .
Apple mentioned that a tvOS app can only access 500 KB of persistent storage local to the device using the NSUserDefaults class. However, the app can store and retrieve user data in iCloud.
- WebView doesn't exist in tvOS.
Recap
You can find finished examples that you followed throughout this post here.
We learned that tvOS app development is not difficult if you already have some knowledge in Swift and UIKit (or SwiftUI). When users interact with the app using the TV remote, views change state, allowing us to update the UI based on this state through the available presses functions. For diagonally aligned views, we need to use UIFocusGuide to handle focus change.
Additionally, you found out that tvOS has some restrictions that we need to consider before implementing the app.
I hope you enjoyed reading and found something valuable to use in your tvOS project.